All posts tagged: plywood

The Harrogate Master Suite

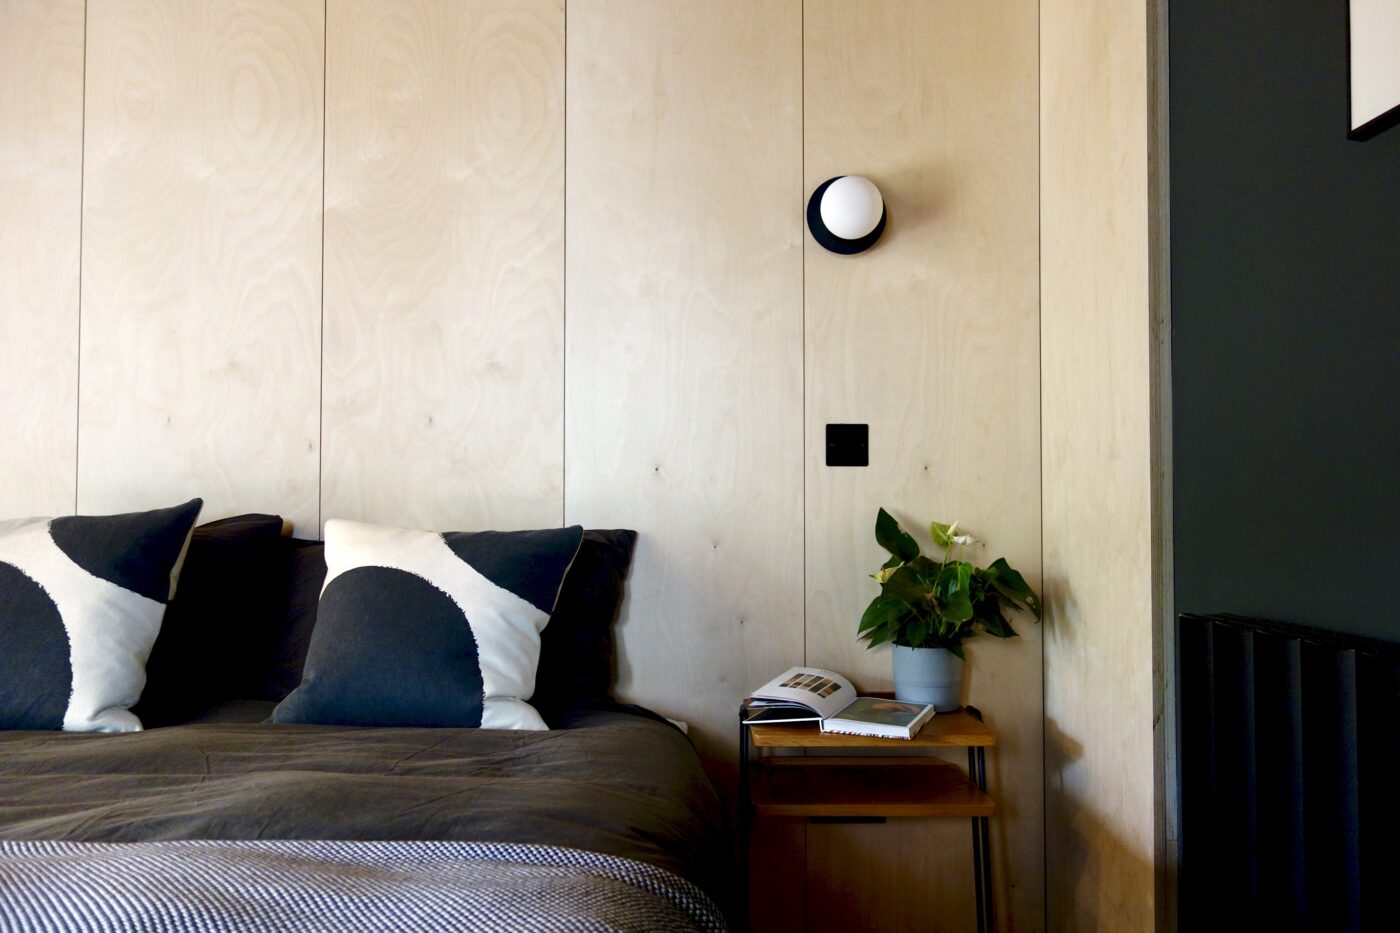
The Harrogate Master Bedroom – (very nearly) Final Reveal

Hello everyone, how’s your August going? Today I’m sharing a (very nearly) final reveal of the master bedroom at the Harrogate project. It’s the last room to be completed after a four year long renovation of a large, five bedroom Edwardian property. I’ve learned and gained so much from working with Vanessa and Andy and it feels quite emotional knowing this will be one of the last rooms I share from their house on these pages. Anyway, moving along… First Floor Floor Plan – Before The first floor is the one that had the biggest layout change, with only a few walls remaining where they once were. The first floor layout as it is now. As you can see, the first floor is where the Upper Brook Street Guest bedroom is, probably one of my most shared and liked projects to date, winning the best bedroom tour on Houzz in 2017 – that was really exciting! Today’s master suite is across the landing at the back of the house in what was this space: It …

Making Spaces Plywood Kitchen

Kitchen Facelift – Final Reveal

I told you it was coming soon! If you read my last post, you’ll know it was time for me to say goodbye to our gloss white kitchen. Feel free to have a little read of that one if you want to know the what’s and why’s… Adios white gloss! Here’s the wall cabinet layout i’ve had in my head for years and the one I think it going to make our little kitchen look hell of a lot better AND give us more much needed storage.I wanted to move the existing wall cabinets up towards the ceiling, wrap a third cabinet around the extractor hood and add two more open cabinets below, either side of the extractor. Simple no!? I didn’t want handles but I also didn’t want the traditional handle-less J profile design our original kitchen doors had. If i’d gotten my way, I would have had doors than opened by telekinesis, but as my powers of mind-control weren’t quite up to scratch, we went with push openers instead. Fair enough. It’s difficult to …

MADE.COM photoshoot

Kitchen Facelift – Goodbye white gloss

There’ll probably be a lot of people out there reading this blog post thinking, “there’s nothing wrong with your kitchen, love. What ya updating it for?” And one of those people is my husband. So I just wanted to say from the start, I get it. Me, wanting to update a perfectly fine kitchen might seem a bit unnecessary. Especially when it was originally like this: You can read all about the kitchen knock through we did in 2013 here. It’s still one of my most read posts as it seems a lot of you out there are still researching knock-through options, so it’s defo worth a look if it’s on your list of house jobs. And whilst i’m so happy with the new layout and extra space we created in 2013/14, the actual kitchen doors began to annoy me, more and more once i’d taken the step into interior design in 2015. I’ve been patiently waiting to get this kitchen looking more like me without making any huge changes. I didn’t want to buy new …

Plywood Floorboards

The Plywood Floor – 15 months on…

Feature image – MADE It’s been 15 months since we laid the plywood floor in our loft space. We converted our second floor back in autumn/winter 2016 and finally completed the project in Spring 2017. Since then a load of people have been contacting me about the floor in our loft space and how it’s held up. Well, I did promise a review after a year, so I am a little behind, but i’ve finally gotten around to taking some pics of the floor as it is now, 15 months after it was laid and since lived on. Time to hand in my homework. I’ve taken some of the furniture out so you can see more of the boards for yourself. I’m really happy with how it’s fared and so glad we took a punt on an alternative flooring. Sure, it’s taken a few dinks, but then it’s a floor, so ya know, it’s what they do. In fact, it was me that gave it its first scar by rolling a mini filing cabinet from the …

Lego Storage

Charlie’s bedroom – Part 2 – The Plywood Wall

Charlie’s room has ended up being a much larger project that originally planned (sorry Pete). The whole design process has been bubbling away in the background for a few months now and am so excited to finally share Part 2. (Part 1 here). This kid’s bedroom is all about the plywood!! There are still plenty of pieces left to go in (carpets and single bed) but it’s the joinery that’s really transformed this room. So let’s get on with the pics shall we? Before After Before | During After I absolutely love it. It’s so mental to see an idea in your head executed so accurately. The guys from Leeds and London based Bare Joinery are mega. Give them a follow, because i’ve been bullying them to set up a proper Instagram account for months and i’m going to look like a right numpty if it’s tumbleweed. The design is a perfect marriage of function and form. I’ve finally reclaimed the living room (and several other parts of the house) and have managed to get all …

Charlie’s Bedroom Re-design – Part 1

What a week! The Interior Design Collective launch completely blew my mind. It seems quite a few of you think it’s a rather good idea. Which is brilliant. View this post on Instagram A post shared by Karen Knox – Making Spaces (@makingspacesnet) Thank you so much again to everyone who sent their best wishes. It was an amazing day. So back to normality again. Whatever that means. I’m cracking on with the next project at home, which is Charlie’s room. Remember me introducing that one a few weeks ago? If not, you can pop over here for a brief catch up. The plan was to build a unit across the whole of the back wall so Charlie’s new single bed could sit right alongside. There wasn’t really anywhere else in the room it could go due to the door swing and the window/radiator situation. After toying with several different ideas about what material to use to build said unit, I had to rule out Valchromat on cost alone. This left us with MDF or …

Open plan landing and staircase

Banisters, balustrades and building regs

So where were we? That’s right, we were here. Awaiting new carpets, a banister and handrail. I did not want a banister or a handrail. But the building inspector does. And I guess it’s not that realistic to keep it like this forever. Even though is looks so purty. After mulling over several ideas (metal, glass, A.N. Other, you can check out all of my ideas here on Pinterest) we stuck with what we knew and also what we liked best. Timber. Not just any old timber though. Two 24mm sheets of birch ply laminated to form a 48mm depth board and then ripped into cross sections. These lengths would become our “spindles”. We fixed a timber baton to the ceiling to make sure the top of the spindle, once screwed in, aligned itself vertically so the bottom of the spindle attached perfectly to the side of the staircase stringer. The baton was filled and sanded back several times, then caulked and painted over in emulsion to make it appear part of the plastered ceiling. …

Ikea FALSTERBO Marla Singer

The Loft Landing – Final Reveal

There’s just one space left to reveal now from the loft extension. You guys will have seen the open plan landing/office below with the staircase leading onwards and upwards to our new second floor. Open Plan Office Space But what you may not have worked out just yet is how it all connects together. Designing individual rooms can be tough, but designing rooms and spaces that connect with one another, not just physically but aesthetically, that’s a real challenge. Especially transitional spaces like hallways and landings where walls and levels connect over several floors. How do you make these work? This is the view standing at the bottom of the staircase. Remember i’m in my office here too. The element of shared space which works so well here, the office enhancing the staircase and vice versa. Here is the floor plan of the second floor. I saw the landing as another room in itself. They’re often neglected spaces, quite narrow and can be dark. I didn’t want any of these things to be the case. …

Plywood floorboards, ply flooring

The Loft Bedroom – Final Reveal

We did it! We have our new loft bedroom, all done and ready to rock. Four months after we started our build, i’m finally able to share the final reveal photos with you. I’m going to warn you right now, this post is PIC HEAVY. Initially I took about 70 photos. I know. That’s ridiculous. I’ve managed to whittle it down to about 30. Still far too many, but ya know what, just scroll along if any aren’t floating your boat. Here’s where we were back in September 2016: And here was my plan for the bedroom: Ok. So here we go. Do come in… The view from the landing into the bedroom. Gets me every time. Chooch the cat, can not get enough of this room. Mainly because she’s got a load of new rugs and blankets to paw at and ruin. We had to be clever with space here as we were limited with how much width we had with the two chimney stacks bookending each side of the bed. The Factorylux Maria Banjo wall …

To ply or not to ply – A floor quandary

We’ve uhmmed and ahhed about what to do with the loft bedroom flooring for ages now. As i’m going all out Scandinavian for the bedroom design, a blonde wood floor seemed the obvious choice. But then, to save some money and get this room finished in time for Christmas, we played around with the idea of simply painting the chipboard subfloor black (to which the builder just sighed and shook his head). After going around in circles for several weeks, mentally noting the pros and cons of both options, we finally decided on floor boards. Done. Having an actual floor laid meant I finally got to work with my fave joiners again, Bare Joinery. Which is always a pleasure, as they’re always up for a challenge and happy(ish) to experiment with materials, the design, the process, and most importantly, they don’t sigh and shake their heads at my less than conventional ideas. Not within view anyway. Our plan to lay floorboards sounds pretty standard, apart from the fact I didn’t want them to be actual floorboards, as …