
Hello everyone, apologies for the radio silence this week, it has been a ridiculously busy week AND i’ve been waiting for my husband to pull his finger out and finish writing something. Yes, this week everyone, you will get to read the design ramblings of him indoors (or should I say, “him outdoors”). He’s finally sent in his homework…. i’ve had a good read, and actually it’s really good (she says begrudgingly). It’s about how he made his own garden workshop which is perfect if you’re someone looking for inspiration on how to build your own garden building/workshop/man cave/she-shed/home office/garden pod…. so many names for these additional rooms. So without further ado…

Iiiiiiiit’s Mr Making Spaces!

**crowd goes wild**
” What’s that…you didn’t sign up for this? You didn’t. Sorry to invade this sacrosanct space of beautiful interiors, design and styling. I’m here to talk about anti-style. Yes…it’s the world of sheds.

During my 39 years on this planet, I’ve learned a few things about life. Here are some:
- Men like a bit of solitude now and again*
- Men want to build a house*
- Men are good at mid-life crisises…crises…crisii…y’know*
- Interior designers like to constantly paint, style, move, fluff etc to the point where one can return home and have to check the number outside the front door (actual fact)
(* – denotes a fact that is almost certainly a gender stereotype.)
Cometh the hour, cometh the shed.
During my first crisis, I bought a classic Mini, so did the decent thing, and bought it a green keeper’s shed to live in. Oh those halcyon days of classic car ownership…

I got over that crisis, and stumbled across a new one: I took up lycra…and cycling. This semi-socially acceptable mid-life crisis still needed an outdoor space. As our house became Karen’s canvas for her work, I needed my own outdoor haven.

Interiors by me

Exteriors by Kaz
Now this thing sat atop a concrete base where a stone built garage had once existed. In order to build myself my workshop of dreams, I needed to move this thing first. How to move a massive shed? I didn’t think much of history in school, but picked up a couple of things… I went full Ancient Egypt, using scaffold poles kindly dropped off by Bond Scaffolding, Leeds, to roll the old girl across a runway of OSB sheets (that would later become the roof) to her temporary resting place** on the other side of the garden. This cleared the space for what would become my finest moment as a grown up. But first, I had to measure up and hit the notebooks, graph paper and laptop.
(** – I managed to flog the old shed on Gumtree for the princely sum £150)
The key to the project was planning. I’m a watcher and learner, and I did labouring for a year a long time ago, so set about scouring the internet for others who had tackled the task. I found a couple of instructional blogs and borrowed Karen’s architect’s rule.

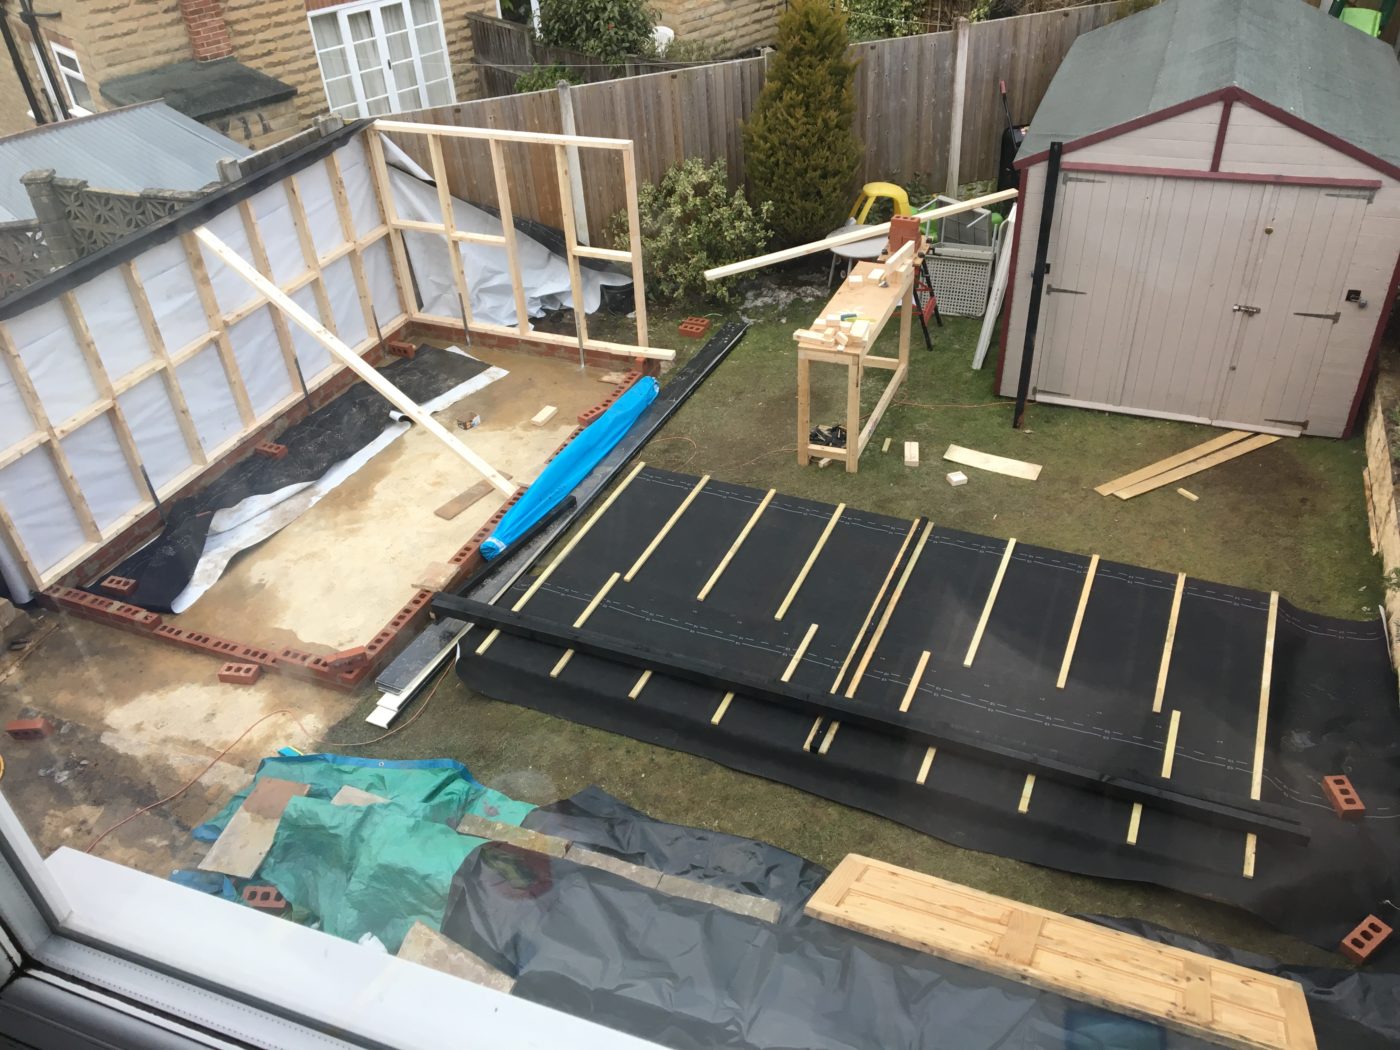
I’m a measure twice, cut once kind of guy, so I measured up for what timber I would need, and then figured out how to make the thing water tight. I opted for a couple of rows of red brick, a layer of damp proof, a timber frame structure, Karen suggested a mono-pitched roof (which frankly was an excellent idea) and then I just had to work out what to shroud the thing in. I opted to cover the structure in a waterproof breathable membrane as I wanted to keep my bits and bobs as dry as possible for as long as possible, and used Onduline Onduvilla, corrugated bitumen roofing tiles to give the birds a comfortable resting place whilst keeping the weight down.
I had always planned to use a simple feather-edge board to finish the outside, and we were lucky enough to have salvaged a couple of uPVC windows from our old patio door. I used a variety of black uPVC products around the roof, windows and door frame having spent way too long gawping at sheds, outbuildings and loft extensions around Leeds (and beyond). The key to any successful project is understanding how different materials meet and interact. Water has a funny way of finding you out if you slack on this one.
The timber arrived along with my annual leave…and the beast from the east, which made for an interesting four days, but this happened:

Old workshop moved from one side of the garden to the other. And snowed on. A lot.
I’m not here to give a blow by blow account of how I put the thing up, but will say this; never underestimate the power of YouTube. Apart from getting a hand lifting the left-hand wall into place (I had to pre-clad it as I couldn’t squeeze down to clad it once up), I managed this on my own. Admittedly, I am stubborn / bloody-minded / an idiot (yes, thanks Kaz), but it is amazing what you can achieve with zero training. Here are some progress pics…


I did a lot of shed research before I took the plunge here. For something of this ilk – 4.2m x 2.6m – I was looking at the thick end of £5/6k for something that looked like it would stand the test of time. I’d papped myself as my finger hovered over the ‘complete order’ button for the big timber order (which alone came to over £400), but the bill for the building materials to complete the exterior to this point was just over £1,750.

Laying the bricks took a day. To get the structure up, shrouded in the membrane and latted took four (weather interrupted) days. The outer cladding, windows, and door frame took another three days.


I called on our friendly neighbourhood joiner to hang me a pre-bought custom sized door. The pitch of the roof, the internal plan and ‘permitted development’ constraints meant I wouldn’t have sufficient height for a standard sized door. Evan (the joiner), the door, hinges and the locks set me back another £300, but hey, at least I didn’t completely shaft a brand new door.

Outside shell – DONE
I’m a big fan of David Lynch who in one of his books writes:
“Some mornings, in a perfect world, you might wake up, have a coffee, finish meditation, and say, “Okay, today I’m going into the shop to work on a lamp.” This idea comes to you, you can see it, but to accomplish it you need what I call a “setup.” For example, you may need a working shop or a working painting studio. You may need a working music studio. Or a computer room where you can write something. It’s crucial to have a setup, so that, at any given moment, when you get an idea, you have the place and the tools to make it happen.
When you don’t have a setup, there are many times when you get the inspiration, the idea, but you have no tools, no place to put it together. And the idea just sits there and festers. Over time, it will go away. You didn’t fulfill it—and that’s just a heartache.”
— David Lynch, Catching the Big Fish
I needed a set-up. I wanted power. Many, many sockets. I wanted light, I wanted dark. I do turbo training (fancy exercise biking, to the uninitiated), I like messing about with wood…and bikes…and other things. A cold, concrete floored box wasn’t going to be enough.


Having fished around for quotes for an electrician (never accept the first quote!), I had five double sockets, an LED panel light panel and an extractor fan wired up, I insulated the walls and ceiling with semi-rigid rock-wool (I flippin’ hate that job), clad the internal walls in 9mm OSB, used adjustable decking base cups to lay floor joists on the slightly wonky base, put down that green floor chipboard stuff and some delightfully cheap but seemingly hard-wearing lino.


I got some blinds and desk legs from Ikea, some of those adjustable shelf brackets schools used to have everywhere, and ripped up a load more OSB sheets for shelving and a work bench.

The workshop inside
The electrical work and fittings came to £490. Bearing in mind we needed the electric running from the consumer unit in the house and half way down the drive (and getting all of the sockets a boy could want), this seemed pretty reasonable. It cost another £800 to make the inside look properly habitable, but again, I wanted a safe haven from the ever-changing environment of an interior designer’s house.

It’s difficult to put an hour count on things, but after the first four days, the rest of the project happened over several weekends, completely finished after three months. If my records are half as good as they look, the whole thing came in at £3,350. Not only was this a hefty saving on the ‘off the peg’ options, it has insulation, electrics, double glazing, internal cladding, a big light, and a door they won’t be levered off by a passing scoundrel (fingers crossed). Another bonus being that my mother no longer fears me having a third crisis and jacking in my job, as I have a skill to fall back on.

One year later, it is still warm (I have a couple of tube heaters that kick in when it’s really cold), it’s still dry, and I do not allow rogue items to stored – just a sensible amount of tools and paint. I am absolutely loving a space where I can train, tinker, listen to music, watch football, and just be. My stresses and strains melt away when I’m in there because it surrounds me with a sense of achievement, and my possessions that I love. I choose what goes on the walls, I choose how tidy it is. I have my set-up, and I’m not afraid to use it.

Here are some photos taken by her ‘indoors’ as apparently my phone pics haven’t quite cut the mustard…


So there it is. The before, the during and the after. I’ve added a table below that gives you a breakdown of costs and where it was from. Obviously, for those of you looking to undertake your own build, find your local, well respected timber merchant and make sure you research the best possible materials for your outdoor building, whatever that may be. Good luck. We’re all counting on you.”
| Product | Supplier | URL | Actual Cost |
|---|---|---|---|
| Bricks | Milfords | https://www.milfordbuildingsupplies.com/hansonredblend | 64.5 |
| Damp proof membrane | Milfords | http://www.milfordbuildingsupplies.com/pvcdpc100.html | 2.76 |
| Timber 100x47 | Milfords | http://www.milfordbuildingsupplies.com/timber/eased-edge-softwood/timber-4x2.html | 240.42 |
| Restraint straps | Tool Station | https://www.toolstation.com/shop/Construction+Materials/d210/Builders+Metalwork/sd2797/Light+Duty+Strap+Bend/p77295 | 10.6 |
| Middle of cladding timbers | Milfords | http://www.milfordbuildingsupplies.com/rst-36-4750.html | 8.01 |
| Corner timbers | Milfords | http://www.milfordbuildingsupplies.com/rst-36-47163.html | 16.54 |
| Screws | Milfords | http://www.milfordbuildingsupplies.com/440reisserscrew.html http://www.milfordbuildingsupplies.com/590poziwoodscrews.html http://www.milfordbuildingsupplies.com/445poziwoodscrews.html http://www.milfordbuildingsupplies.com/3530poziwoodscrews.html | 65.64 |
| OSB sheets (roof) | Milfords | http://www.milfordbuildingsupplies.com/sheet-osb-180.html | 29.44 |
| Roof membrane | Trade Store | https://www.tradestoreonline.co.uk/Breathable-Roof-Membrane | 45.49 |
| Laths 38mm x 19mm | Milfords | http://www.milfordbuildingsupplies.com/slatelath-1938.html | 27.72 |
| Door / window return PVC | Premium Plastics | http://www.premiumplastics.co.uk/black-ash-pvc-soffit-board-9mm-938-p.asp | 37.04 |
| Window sill | Premium plastics | http://www.premiumplastics.co.uk/black-ash-internal-window-sill-cover-1047-p.asp | 40.2 |
| Dry verge | Kytun | http://www.kytun.com/p/tile-dry-verge-system-pvc-60mm-black-24m/c08pbl | 77.87 |
| Roof tiles / fixings | C&A Building Plastics | https://www.cabp.co.uk/Roofing-Sheets/Corrugated-Sheets/Onduvilla-Tiles/Onduvilla-Tile-Slate-106M-x-04M-Ideal-For-Sheds-Black_ROVTBK.htm | 235.31 |
| Vented cladding starter | Profile store | https://www.profilestore.co.uk/products/facade-profiles/ventilation-profiles/protektor-black-pvc-ventilation-angle-25mm-x-25mm-x-25m-1-length | 46.18 |
| Timber cladding | Estate Sawmills | http://www.estatesawmills.com/125mm-feathered-edge-timber/product/feathered-edge-boards-125mm-wide/ | 153.71 |
| Ventilation grill | Amazon | https://www.amazon.co.uk/dp/B074HBMVG7/ref=pe_3187911_185740111_TE_item | 6 |
| Fascia board / fixings | Premium Plastics | http://www.premiumplastics.co.uk/black-ash-upvc-fascia-capping-board-33-p.asp?_=&variantid=51 | 89.7 |
| Door frame | Howdens | https://www.howdens.com/joinery/door-fittings/door-frames/howdens-hardwood-door-frame-obj-sku-family-dfr0305 | 54.98 |
| Door | Door Deals | https://www.doordeals.co.uk/products/external-doors/solid-external-doors/redwood-tw-flb.aspx | 168.95 |
| Insulation | B&Q | https://www.diy.com/departments/knauf-earthwool-cavity-slab-1200mm-455mm-75mm/330686_BQ.prd | 111.7 |
| OSB cladding (internal) | Milfords | http://www.milfordbuildingsupplies.com/sheet-osb-90.html | 217.87 |
| Lighting | LED Panel Store | https://www.ledpanelstore.co.uk/led-panels/1200mm-x-300mm-led-panel-4000k.html | 63 |
| Extractor Fan | Toolstation | https://www.toolstation.com/xpelair-c4s-100mm-simply-silent-contour-extractor-fan/p78753 | 39.98 |
| Electrician | Rod Timmins | 386.19 | |
| Decking pedestals | Access Flooring Shop | https://www.accessflooringshop.co.uk/products/rda-1-ryn0-deck-adjustable-self-levelling-timber-deck-support-40-mm-56-mm.html | 124.15 |
| Floor joists and boards | Milford Builders Merchants | 122.45 | |
| Lino | 86.59 | ||
| Wood preserver | Amazon | https://www.amazon.co.uk/gp/product/B001GU4B1C/ref=ppx_yo_dt_b_search_asin_title?ie=UTF8&psc=1 | 35 |
When I saw the pitch of the roof, the first thing I thought of was…the water’s going to POUR onto the neighbor’s property! In looking closely at the later pictures, though, I did see a gutter, and I’m assuming it drains to a what we call a downspout on the side of the shed opposite the door.
Being nosy (and anticipating gutter/downspout replacement for our garage) I wondered how much the gutter/downspout combo costs in the UK (I’m in the US), but I didn’t see anything comparable in the spreadsheet. I looked up “dry verge” but that seems to be the end caps for roof. Were gutter and downspout costs included in the dry verge order? That would be logical, since it all would need to match.
Hi there! Pete here. Knowing that everyone would have different ways they would want to deal with their rain water, I didn’t go into detail on this. You are quite right though – I ran guttering down the left hand elevation and round the corner to the back where it drains through a down-pipe into a water butt (so we can use the rain water for the garden). With a few leftover bits, the guttering cost £29.77 from screwfix.com – a trade-leaning tools and building supplies company. These were separate to the dry verge, which catches water on the front and back edges of the roof, carrying the water into the gutter rather than over the head of yours truly. Dry verge was a relatively expensive extra, but wanted to build something to last for the long term.
Thanks for the update, Pete! As far as I’m concerned, there’s no such thing as too much detail when you get to construction hints, as I learned when we recently did a bathroom refresh (meaning, everything but tub and toilet). Contractor and I were gushing over the finished job when we both happened to look down at the heating register cover by the door. Neither of us had thought to include in the specs. Le sigh. I tell people it is the imperfection we built into it so it wouldn’t be perfect, like one does when weaving a Persian rug… Maybe I’ll get to it this winter.
No reply necessary, btw. Just wanted to share. Also, thank you both for fascinating reading! I found Making Spaces a year or so ago after a UK follower of the Ask A Manager blog mentioned it (I forget the context).
Looks brilliant Pete and also dead handy you listed everything you used too as some of the work i was thinking about what you used so good to see it in in the list. Did you use any power tools such as mitre saw or nail gun for the classing or was it all by hand?
Being another Leeds (north) resident do you fancy coming and building one on my slopped garden for me? haha!
Great work very impressive!
Richard
Hi Richard. Thanks very much for the props!
My only specialist tool was an electric mitre saw, which I borrowed from a friend. I think I would’ve lost the plot with anything less. It inspired me to buy one for myself in the end, as whenever a job gets added to my list, it’s always the wood cutting which puts me off.
I actually screwed it all together. It was a bit more time consuming, but I want this thing to stand up forever, and I’ve made it so I can replace any of the bits without too much of a nightmare. I used a modest DeWalt drill, and if I was starting again, I’d probably get a second one to save me swapping drill bits and screwdriver bits.
As for the ‘job offer’, I think my day-job diary is a bit full at the mo!! Have you considered a tree house?
Pete
Hi, did you take any damp membrane measures on the concrete slab? You said about a dpc on top of the bricks but what about damp coming up through the floor? I’m panning my own similar (mono pitch) mancave (with turbo trainer) on and existing concrete slab, that’s the only bit I’m unsure about. She’s a beauty btw!
Hi Glenn,
Thanks very much! I got round the slab / damp issue by resting the floor joists on plastic adjustable decking cups, this way there could be no transfer of moisture from the slab. I sacrificed a bit of head height in doing this, but as my floor was so uneven, it wasn’t a difficult decision. I put a couple of metal vents in the finished floor to allow a bit of airflow underneath.
My other consideration was to lay 4″ DPC under each floor joist directly on the slab. I reckon the finished floor would resist any movement (under pressure of furious Zwifting) if the floor boards were a nice fit and screwed down into the joists.
Good luck!
Hi Pete and Karen!
Can I ask if you put any means of ventilation in? Or do you not need that if you insulate? I’m a long time follower of your blog Karen and saved this story ages ago after following on from your new driveway post (amazing transformation btw!). Really hope you are both well (thinking in terms of your wonderfully honest and open real life and health post in Nov) and coping ok with these current challenges. All the best
Hi there! Pete here.
Thanks for following, and for your good wishes! These are trying times, but we’re doing our best to adapt.
Do I sense an impending self-build??? I probably went a bit over-board with the ventilation on the workshop, as I knew how much sweat and how many tears would be shed (sorry) inside it. As I use it for bicycle training, I had a bathroom extractor fitted to help keep the place a bit better aired. The re-used windows have two little vents on them too.
Aside from the extractor, I put a couple of small vents in the floor, as I didn’t want the under-floor space to suffer with damp coming up through the concrete. I had used an existing concrete base which was laid pre-building-membrane when the house was built, so imagined it’d be a bit susceptible to the old rising damp, as is the case with some of the neighbours’ garages.
It’s been up for two years now, and is standing the test of time (the greatest test there is!!) so I’m glad I added these additional features. If I work up a sweat in there, it’s certainly evident, but clears pretty quickly.
Pete
Sorry…me again.
To address your other question, I’m not aware of any build up of moisture when I’m not training in the workshop, so I don’t think it’s vital. The insulation certainly keeps the place a bearable temperature all year round, but I do have a tube heater set up to take the edge off. I suspect without that, a few of my older tools might start to suffer a bit over the harsh Yorkshire winters!!
Thanks Pete, really appreciate you taking the time to reply. Glad you’re managing ok in all this craziness. And yes, there is a Making Spaces self-build shed on the cards in my back garden 😂 wish me luck, cause I think I need it! Paula
This is a great post, well done! Did you create the shed drawings yourself from scratch? I’m just starting to design my future summerhouse/shed and would like some more info or more detailed drawings to start with, or info on where to get them! You mention ” I found a couple of instructional blogs and borrowed Karen’s architect’s rule” – any pointers to those would be great!
And on a different issue: You laid a two brick small wall and fixed the timbers on that – do you have any instructions or post describing this process, as I have not found something similar by looking around (yet)? How did you fix the timbers on the bricks?
Hi George,
Thanks for your comment! I used a couple of websites / blogs to get my creating juices flowing. One was https://herbidacious.calamus.graphics/the-garden-buildings/the-office-workshops/ and the other was on a website entitled Rural Gardener, which appears to have since come offline.
Having looked at these and worked out what dimensions I hd to work with (in terms of floorplan and height permitted by local regulations), I applied my limited joinery knowledge and drew up pencil drawings of each elevation. I did these to scale on graph paper. I had to pre-plan the total overall height of the roof structure (to ensure my overall height was within regs), but in terms of design, this was much more spontaneous.
One of my greatest learning experiences was that my upright timbers were spaced equally and with strength in mind. I wish I’d considered the application of sheet materials to my thinking, and when I boarded the roof, and clad the internal walls, a few of my uprights did not meet the edges of the boards, so I had put extra pieces of timber in to ensure the boards sat flush.
With regards to the union between timber and brick, I didn’t attach the timber directly to the bricks. I didn’t want to penetrate the damp proof barrier between them. The laths (which the outer cladding are fixed to) overlap the brick work on all four sides which prevents any lateral movement. The timber frame and cladding are of significant weight, so I wasn’t too worried about ‘take-off’, but used eight L-shaped roofing brackets to attach the timber frame to the concrete base.
I hope this gets you to the next stage!
Pete
Hey!
Great build, was looking for something like this to get my head started on my new garden project! I am looking to build a shed to be storage/workshop space as we don’t have a garage for me to tinker in 🙁
Can I ask for the measurements of this as it looks to be spot on in terms of size, I couldn’t quite work it out from the picture of your plans.
Thanks!
Hi there. Thanks so much for this blog post. I’m using it as massive inspiration for my own project!
Just looking at the Feather edge cladding you used- it seems a little thin. How is it holding up? If you think it’s been good for the job then I’ll use the same!
Thanks, Chris
Hello!! What a great shed you made!
Please can I ask. What about your windows?
Where did you get them?
Did you ‘re-colour’ white ones somehow?
Can’t see anything in you description or links.
Thank you, all the best
Dear Karen
A big thank you for this. For fifteen years I had workshops that were spacious for my modest cabinet work. Big three phase machines as well as a fine collection of great tools. But that was in Madeira. After twenty-three years I have decamped to the Cote d’Armor in France. (To be closer to my daughters in England without actually having to return to Blighted.). I have a modest, walled back garden in my townhouse. A shed was needed to have a smaller workshop. And it is in the detail. I have a number of tools on castors and want to be able to wheel them out of the shed to let me have workspace. So, by way of an example, the slab needs to be stepped so the outside is level with the insulated floor inside and a gully needs to be made just outside the threshold to keep surface water out.
But enough of my waffle. Thank you for your site and the links.
If I feel I need some advice (highly probable, my new home was built in 1530 and it is a lifelong project, I suspect. Well, I am seventy years old. I am very happy to pay for any input. And, by the way, there is another reason to make people pay for your advice – if they have paid for it they will take it.
Best wishes. Keep safe.
Charles