
Hello there, and welcome to the other side of our Nude Bedroom. Today i’m sharing our new wardrobes. Doesn’t sound that exciting does it? But we’re both super excited to have said goodbye to our old ones…

… they looked lovely, but there were a bugger to use. The handleless drawers were on wooden runners, so when full of clothes, as most wardrobes are, they were way too heavy to open with ease. Those slim recessed handles were a nightmare for when you’d had your nails done, having to claw your fingers into the recess and heave the drawers open to grab a clean vest. Not cool, Derek. Not cool.

Pic – Katie Lee for MADE
There was also a lot of wasted space. Something I desperately needed more of. This one wardrobe was certainly not enough for my extensive collection of blue jeans, over sized black tops and boyfriend cardigans. So they were sold on eBay and we used the money from those to build our very own dream storage solution using the Ikea Pax system. Something i’m sure you’re all more than familiar with. Nothing new about Pax, it’s been around for years!
I won’t bore you with the details of what shelves, rails and drawers we chose, but I will share a pic of what we knocked up on the Ikea Pax planning app so you can see the layout and how much the cabinets and interior storage cost us.

The Pax wardrobe frames come in two heights, 201cm and 236cm. Our ceilings are 242cm with a sloped ceiling over to the right. So we combined the cabinets to fit either side of the chimney breast as best as we could. To prevent the wasted space above the wardrobe happening all over again, we decided to go full height at 236cm. This did mean however, we needed to build the wardrobe frames upright. There needs to be at least 10cm clearance between the top of the wardrobe and the ceiling to allow for raising after the assembly. Otherwise you’ll need to assemble the wardrobe so it’s standing, like we did. It was a little more challenging and took slightly longer than if we’d built them lying down, definitely not a task i’d recommend doing solo. But with the two of us, it was fine and worth the extra effort to gain the additional space for sure. No more dusty tops of wardrobes!
One thing you may have noticed from the Pax Planner pic, is the fact there are no doors. We definitely weren’t going for the open plan look in here, but I wasn’t really feeling any of the Ikea off the peg doors either (sorry Ikea!). They also don’t sell doors that fitted our set up either. Well they kind of do, their hinged doors come in two widths; 500mm with a 250mm mirrored door option. So we could have made it work if we were desperate, but I didn’t want mirrored doors in here. I wanted a sleek run of almost invisible doors.

Ikea Pax wardrobes about to receive their doors
So what do you do when you can’t find exactly what you want? Design your own bloomin’ doors. Admittedly, I wasn’t able to design invisible doors, but I think what I designed works pretty darn well in this room.

- Seven doors in total in a mix of 500mm and 250mm widths.
- The 500 doors have a groove cut down the centre giving the illusion of it being another door.
- All the vertical lines being equally spaced helps give the room a greater sense of height and continuity.
Why did you have 2 x 250 doors on the right hand side of the right hand wardrobe? Why not have another 500 door with a groove?
Good question. And the answer, the 500 door would have fouled with the radiator that runs along the adjacent wall. Simples.

The Bare Joinery crew doing their thing
One thing to consider if you are planning on doing something similar is your drawer and hinge placement:

Inside both wardrobes we’d chosen the Komplement Drawers to sit across the bottom of the wardrobe. BUT because of the placement of the door hinges, it meant the drawer position is somewhat dictated by the hinges. We didn’t realise this until we’d already ordered and built everything, so there was some interior fitting jiggery pokery to sort in order to accommodate the new door hinges. I decided to just lose a tiny bit of space across the bottom of the wardrobe, where i’ve slid in some of my ballet flats etc. But there are a couple of other work-arounds to consider too:

The first being, a Kompletement Basket for the bottom drawer, like so. The baskets, with their sloped sides allow the hinges and the mesh drawer to sit side by side. So that’s one solution. The second is more complicated; an Ikea hack using low profile hinges along with a groove being cut out of the sides of the drawers. Best to read more about that if you’re planning on going down that route as I discounted that quite soon in my hinge/drawer solution search.
After a day’s work, three sheets of MDF and a few brews, we ended up here:

Bespoke Ikea Pax Doors
At this point, the doors were over to me to finish. I had a load of paint left from decorating this room, so instead of getting the Bare Joinery lads to spray finish them for me, I opted for a DIY paint sesh. I wanted to the doors to look more like the painted wall finish and also the option of being able to paint and update them again in the future.
The doors needed priming first. You can’t just paint over MDF, it’s mega porous so you need to seal it first, just like you would with bare plaster I guess. I opted for Benjamin Moore’s High Hiding All Purpose Primer, letting that dry for a couple of hours then giving it a light sand. Then it was time to crack on with painting them in Benjamin Moore’s, Fox Hedge Tan just like I did the walls. The whole process took me about 4 – 5 hours and i’m so flipping happy with how they’ve turned out. Come see:

Bespoke Ikea Pax Wardrobe Doors
Don’t they look fab against the black Burned Planks flooring from Quick-Step?


The three doors
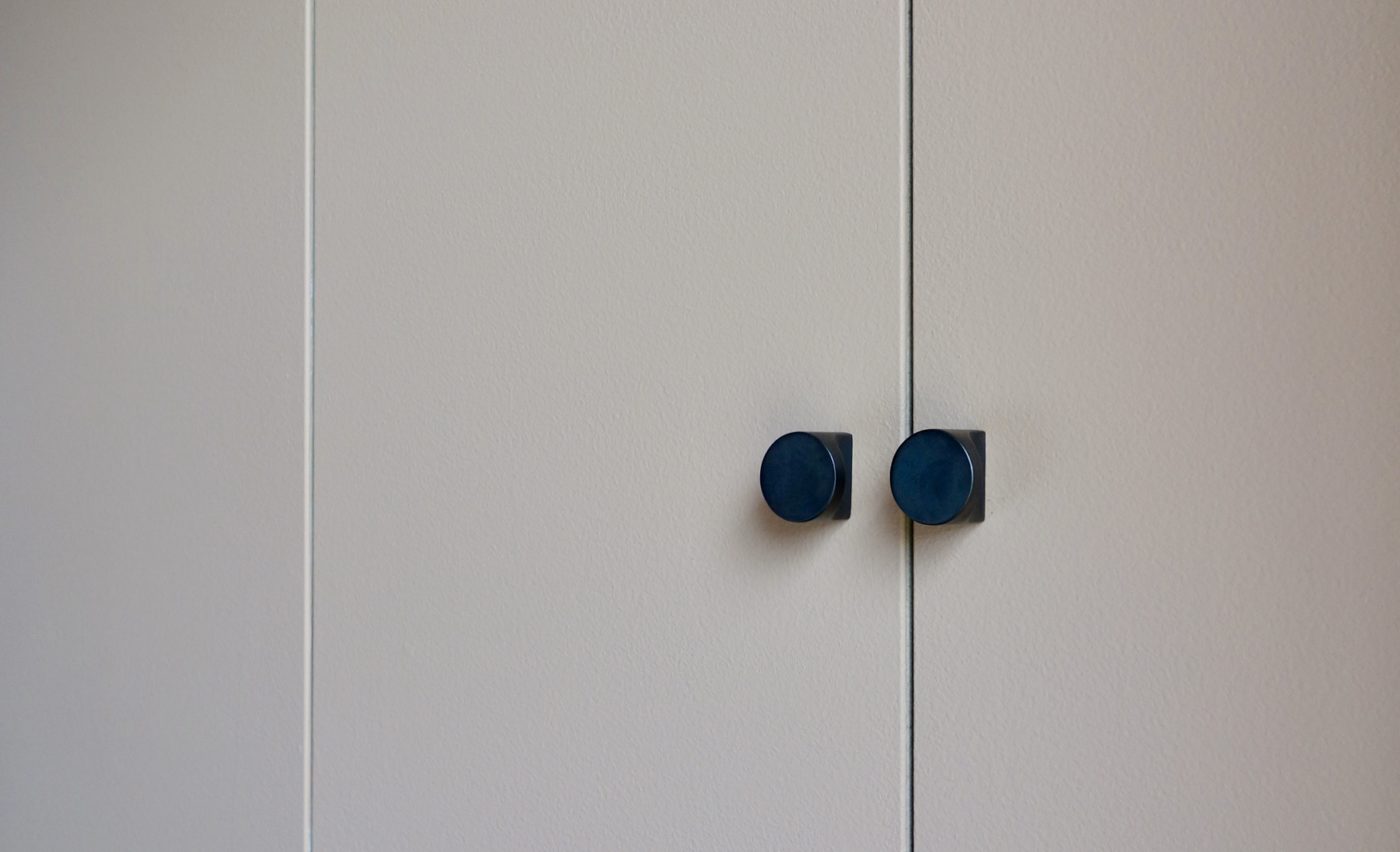
There was one other thing we needed to finish our bespoke wardrobes, and it was door pulls.

I was very kindly gifted a set of seven Dowsing & Reynolds Abstract Pinched knobs in Antique Black. A very simple, ergonomic design, a good weighty piece that your fingers hug perfectly making it really lovely to use. Highly recommended for those that are seeking a quiet, understated look.
Compared to the difficulties during the simple task of opening and closing our previous wardrobe doors and drawers, i’m delighted to say, using our new wardrobes is an absolute pleasure. I actually look forward to putting clothes away. Our room has never stayed so tidy. True story.
And now i’m going to stop talking and post some pictures because I love them and am super excited with our new ‘Nude Bedroom’.

How beautiful does the George Nelson Bubble Ball Light look?

The view from the bed


And because someone will ask; How much did they cost? Here’s a guide for you. Obviously prices will vary depending on your exact Pax configuration, your chosen door design and the joinery fee.
- Pax Frames and Interiors – £550
- Pax Hinges x 7 – £70 (you will need to order these separately as they normally come with the doors)
- Ikea Delivery – £35
- MDF Primer – £20
- Paint – Already had
- Dowsing Reynolds Knobs x 7 – £90.93 (kindly gifted)
- Bespoke MDF Doors – £500 (3 sheets of MDF, workshop time and fitting. Prices will vary)
- TOTAL – £1265.93
Hopefully this will give you some kind of idea of what to budget for whether you opt for Ikea doors or bespoke. The price difference was about £275 – totally worth it in my opinion.

Ok, one last picture showing the room as a whole. All that’s left to arrive is the curtains. Then WE. ARE. DONE!

I always love showing a pic of the actual room when the picture of it has been in my head for so long. I hope you like our new wardrobes as much as we do. Even the hubby has mentioned how much he likes them. Bonus!
Hi Karen, nice work! Our alcoves are 130 wide, pax seems to be 150 or 100, what would you suggest?
They offer 50, 75 or 100 hinged cabinets. We went for a 75 and a 50 to make 125.
Not sure about sliding door options as we didn’t look into those.
Hi Karen
This colour looks really warm – do you think it would work in a north facing study/home office? I’m currently trying to select a ‘warm neutral’ to brighten it up a bit but all the tester pots are looking pretty drab. I need something to contrast with the white cabinets and desk I’m getting.
Yes it could defo work but i’d get a tester first. And remember that ALL colours look lighter when a wall is fully painted. My top tip for choosing colours is to pick what you’d like then move one down on the scale to one shade darker. Good luck!
That is a great tip, thank you.
Karen – your taste is pretty much identical to mine and I’m inspired by how well the dark wood of the pax looks against the nude paint. Im also not a fan of IKEA doors only because they don’t go all the way to the floor. Loving the bubble light – I currently have a fake version! Thanks for the inspiration and attention to detail on hinging etc.
Hi,
Brilliant post.
Could you please share why the length of the doors is 2350mm? I thought the hight of unit is 2260 that would give 9 cm overhand and I don’t think this would cover just a kicking board and top frame? Isn’t it overhanging the top? Thanks for the info, hope to see more DIY projects x
No, no overhang at the top. The extra 9cm covers the paint and frame top and bottom. There’s also about a 10mm shadow gap at the bottom of the doors so they don’t swing directly across the floor.
The actual units themselves are 2360 high. Hope that helps!
Thank you!
I must have misread pax sizing! 🙂
By any chance do you know measurements of hinge placement? Have joiners templated them from the original IKEA pax doors? I am thinking of getting it all done this week, but I really don’t want to mess it up! 🙂
Could you tell me a little about your floor? (Pardon me if you’ve discussed it elsewhere on the site.) If it was stained what was the condition of the flooring prior? It’s really great. Thanks!
Yeah you can read all about it here 🙂 https://blog.making-spaces.net/2019/04/07/making-spaces-with-quick-step/
Hi Karen,
Great blog! I have already ordered a couple of wardrobes from the Ikea Pax, but like you, decided to get fancy bespoke doors. I then went to Google to find out what to do about getting the hinge holes pre-drilled. The doors will be MDF 2PAC coated doors, about 50cm (w) x 265cm (h). I am also getting a side panel for each wardrobe that will be 270cm high, as one side is exposed on each wardrobe.
Did you pre-drill the holes yourself into the doors or is there a way I can know the measurements to pass on to the joiner?
Any help is greatly appreciated!
Cheers,
Naj
Hi Naj, my doors were half made on site so the hinge placement was set to accommodate the internal configuration of each wardrobe. Both are different you see. Ideally you would have the same done to avoid any hinge issues. Good luck!
Thanks Karen. That makes sense!
The last thing I am really struggling to work out is whether it will be ok to only have 4 hinges on each wardrobe door. The doors will be taller than the Ikea carcasses by about 30-35cm as I prefer that look and I would like to store blankets etc above the wardrobe. Do you by any chance know if this would be ok? I know it’s preferable to have a fifth hinge, but I’d love to get away without it!
Cheers,
Naj
Thank you Karen
This is a great hack! we are looking to do the same thing on a 400×236, thinking 8x50cm.
My i please ask a question regarding the hinges positions with dimensions? and are they 3 or 4?
This will help planning the wardrobe interiors so there is a clear space for the hinges.
This is brilliant.
Thank you.
Hey! can you point me in the right direction on where to place the holes on the door for hinges! been looking for a guide on this to no avail!.
Hi Karen,
Great post and your wardrobes look great. Sorry to ask another question about the doors but I am doing up my daughters room and wanted symmetrical doors not the 25/50cm split that they provide. Did you use IKEA KOMPLEMENT hinges? If so are they the standard 35mm hinge hole which is 22.5mm from the edge? If you used non-IKEA hinges, did they fit into the holes on the wardrobe or did you have to drill more? Any help, much appreciated, regards Rob
Hi Rob, yes we just used the Ikea Komplement hinges, I have no idea about the drill holes on the doors as this was all sorted by my joiners. But the hinges were fitted to the existing holes drilled into the wardrobe carcasses, no need for more holes to be drilled. Hope that helps!
Thanks Karen, really helpful thank you. I don’t suppose you could measure the gap between the edge of the door and the hinge hole could you? On my other doors it is 0.5cm. This will give me all the information I need. Many thanks, Rob
Hi Rob, the drill centres for the hinge screws are approx 30mm from the edge of the doors.
Thanks Karen, that’s great. It seems like the IKEA hinges are different sizes to “normal” hinges so will have to use those to fit into the holes and to avoid drilling new ones. Hopefully I am getting there now 🙂
Love it all! Your whole room looks gorgeous. The custom doors really set the whole thing off. Great job!
Tricia // COVETbyTricia.com
Think filling the gap to the ceiling would make it look a whole lot better and be more practical for cleaning.
I disagree. If I was trying to make them look like fitted wardrobes across the length of the wall, then yes, I agree. But they are clearly meant to be freestanding wardrobes. Adding a filler piece to the ceiling but not down either side would look daft.
Hi
Love your post. I just moved in to my new home and I am in similar situation as yours. The height of the wall is 242cm ie for 236cm wardrobe, I don’t have enough clearance space.
Could you give me some suggestions, tips and any YouTube video links that can help me built it upright.
Thanks.
Hi! Love those knobs a lot. I’m not managing to find them any where online. Do you the exact name of them? I’ve tried Dowsing & Reynolds webpage and google in general. Many Thanks.
love the color of the accent chair. one of my favorite colors. It goes really well with that shade of blue. Nicely done