
It’s new project time today. Yay! And it’s twice as exciting as normal as it’s in collaboration with Rebel Walls. Yay yay!
Let me set the scene….

Before – July 2019
I was invited to a lovely house in North Leeds a few months ago to tackle the design of the family room which links directly off their kitchen diner. It was a lovely but rather awkward space set on two levels.

Before
On the lower level there was a large white leather corner sofa facing a large wall mounted TV and sound bar, along with large French Doors into the garden.

The top level was a play area where the kids toys and games were kept. There are also three doors in this area, one off the kitchen, one into the garage and one to the outside. So it was mainly used as a walkway, resulting in the middle of this upper tier being left unusable except for passing feet.

View walking in from the kitchen
As their two children had now grown and both having large bedrooms upstairs, the playroom was now obsolete. The homeowners were wanting to turn this split level space into a cosy snug, perfect for family movies in front of the TV, but also somewhere the adults could retire to for grown up drinks at the end of the day.

Before
Initially they wanted to go dark, leaning towards rich jewel tones with some kind of Crittall-esque bespoke room divide to replace that spindle banister. The idea of wallpaper or a mural appealed to them massively, but we needed to make sure the colours worked with some of the other elements. Especially the bits of the room that were staying;
- the oak floor
- the white leather corner sofa
After getting to work on the design and trying several mural combinations, the white sofa just looked off surrounded by these warm, rich colours, especially next to the oak floor. They were just fighting with each other. And whilst the white leather sofa, not being a preference of mine (and me being super tempted to twist their arm to update the sofa to something easier to work with) it was my job to create a scheme that embraced it whole heartedly.
The solution? Jewel tones were out and I began to play around with colours that complimented white and black with ease.
Answer = Sage-y Smokey Green

‘The Snug’ – Mood Board

MURAL COCHIN – a design collaboration between the Barcelona based brand Tres Tintas and Rebel Walls.
It was this mural that started to pull the white leather sofa into the design. Can you see the delicate white details in the pattern above (it’s around the head of the elephants if you’re struggling to spot it). By going green and connecting this room with the garden view through the French Doors, it all started to fall into place. I purposefully added more white elements with the white opal Bubble Chandelier from Downsing & Reynolds and the white shearling chair. The off-black woodwork gives a nod to the Crittall details they were craving, whilst also framing the flooring. Something the oak was calling out for.

Wall Elevation 1 – The Sofa Wall
Instead of adding adding a room divide, I decided it was best to have none at all and completely open up the room. It allows the sofa to feel like it’s been sunken into the floor and most importantly allows the mural cross from one side of the room to the other with no visual break. The drop from the top tier down to the bottom is only about 35cm (less than the height of a chair seat) so regs wise we’re totally fine to remove this btw. Fear not.

Wall elevation 2 – Drinks area on the upper level
The mural wraps around the top section of the room where it will now house a large sideboard for drinks. The view of the two doors in the corner of the room will be disguised with oversized palms and plants. A really simple thing to add and move around when necessary.

Before
Now let’s talk about this area shall we? Nobody needs this socket, switch and cabling hell in their lives do they? So all of this got rewired over onto the other side of the room so all of that electrical malarkey will soon sit inside the drinks cabinet. Yay.
You can see here through the legs of the wallpaper table:

During – eagerly awaiting its mural (so much better without that balustrade eh?)
Now this all works apparently because the TV can connect to it all wirelessly. I don’t really understand this witchcraft, I just know that now, none of that cabling will be seen and instead the TV wall will now look like this:

Wall Elevation 3 – TV wall
I’m really hoping the shearling chair makes it in here, but I suspect after a conversation with the homeowners yesterday they might now be getting some kind of stove put here which would also be a rather lovely addition to the room. But obviously not as beautiful as that chair (did I mention I loved the chair?)
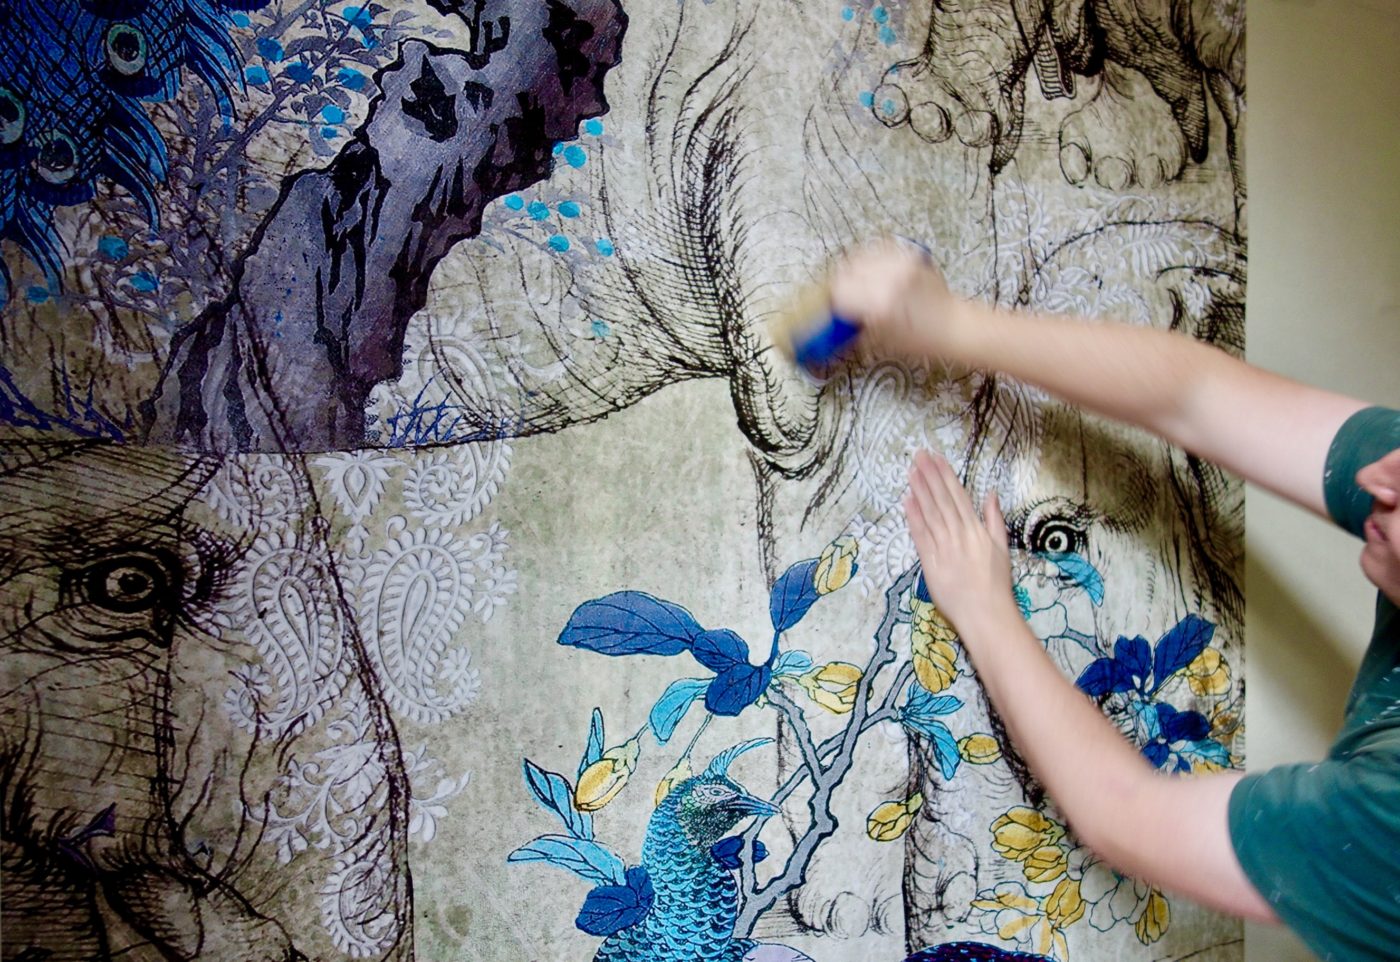
So I’m going to leave you with some in progress shots of the mural going up yesterday. Always super exciting to finally see a drawing on my screen come to life!


So that’s all for today. I will be back with a final reveal post of this project in about a month’s time. Am looking forward to sharing the finished room with you all, that’s for sure!
And as this is probably the last post from me for 2019, I’d like to thank you all of those who have supported both me and the blog this year. Sending my very best wishes to you all for a very lovely Christmas and a fantastic start to 2020. See you next year peeps xx
**This post is written as part of a collaboration with Rebel Walls. I was very kindly gifted this wallpaper for this project. All words, images and opinions are my own and I only ever work with brands I really love and think you will too. Don’t forget to check back in next year to see the finished room!
The mural really ties it all together and I love the colour scheme. Will look fantastic. Years ago we had a split level extension built. The difference in levels is 41 cms. The local authority insisted that we had a balustrade. Only recently we decided that as our sofa backed onto the whole drop, it was totally unnecessary safetywise, so we took it down. It has completely changed the look of the room, just as it has for your clients. Look forward to seeing end result.
Oh how annoying for you. It’s weird as you’re allowed to have no balustrade or handrail for the first two steps of a staircase, so why on earth they got a bee in their bonnet about a 41cm drop is beyond me. And thank you – I’m looking forward to seeing the end result too! 🙂
Wow, this looks wonderful! I do like it when you discuss problems and their solutions, and you’ve come up with a belter of a room fix for the oak floor and white sofa combo! I love the mural wall – it’s absolutely gorgeous, and those colours are just beautiful. Oooh!
Thanks Elaine, I find it really helpful to analyse my decision making – both for you guys and also for me! Really pleased you like the overall design, I’m really looking forward to seeing it all come together!